2023年8月4日金曜日

20230805a 円周 植栽

円周 植栽


テクスチャー作成では、配布サイト

https://vook.vc/n/5755


https://styly.cc/ja/tips/blender-modeling-start4/#


Blender2.9 平面オブジェクトに画像テクスチャを貼り付ける方法


# コレクションを作る 重複の場合 作らない

import bpy


# List of collection names

collection_names = [

    "土台",


   "単位円 torus",

   "単位円 torus",

   "単位円 torus",

   "単位円 torus",

    "xyz 軸 円柱"

]


# Function to create a new collection if it doesn't exist

def create_collection_if_not_exists(name):

    if name not in bpy.data.collections:

        collection = bpy.data.collections.new(name)

        bpy.context.scene.collection.children.link(collection)


# Create collections

for name in collection_names:

    create_collection_if_not_exists(name)


blender python

xy平面に 半径1、半径2の円を作る

名前 "円板 dodai”

円中心 000


xy平面に 1辺2、1辺4の正方形を作る

名前 "正方形 dodai”

円中心 000


写真を貼れるように

メッシュと マテリアル設定して


import bpy

import math


# Function to create a circle

def create_circle(name, radius, center):

    bpy.ops.mesh.primitive_circle_add(radius=radius, location=center)

    obj = bpy.context.active_object

    obj.name = name

    return obj


# Function to create a square

def create_square(name, side_length, center):

    vertices = [(-side_length/2, -side_length/2, 0),

                (side_length/2, -side_length/2, 0),

                (side_length/2, side_length/2, 0),

                (-side_length/2, side_length/2, 0)]


    edges = [(0, 1), (1, 2), (2, 3), (3, 0)]


    faces = [(0, 1, 2, 3)]


    mesh = bpy.data.meshes.new(name)

    obj = bpy.data.objects.new(name, mesh)


    bpy.context.collection.objects.link(obj)


    mesh.from_pydata(vertices, edges, faces)

    mesh.update()


    obj.location = center

    return obj


# Clear existing objects (optional)

bpy.ops.object.select_all(action='SELECT')

bpy.ops.object.delete()


# Create circles

radius1 = 1

radius2 = 2

center = (0, 0, 0)


circle1 = create_circle("円板 dodai 1", radius1, center)

circle2 = create_circle("円板 dodai 2", radius2, center)


# Create squares

side_length1 = 2

side_length2 = 4


square1 = create_square("正方形 dodai 1", side_length1, center)

square2 = create_square("正方形 dodai 2", side_length2, center)


# Add material with image texture to the objects

def add_image_texture(obj, image_path):

    mat = bpy.data.materials.new(name="Image Material")

    obj.data.materials.append(mat)

    mat.use_nodes = True


    nodes = mat.node_tree.nodes

    principled_bsdf = nodes.get("Principled BSDF")


    texture_node = nodes.new(type='ShaderNodeTexImage')

    texture = bpy.data.images.load(image_path)

    texture_node.image = texture


    mat.node_tree.links.new(texture_node.outputs["Color"], principled_bsdf.inputs["Base Color"])


# Replace "image_path" with the actual path to your image file.

image_path = "path/to/your/image.png"


add_image_texture(circle1, image_path)

add_image_texture(circle2, image_path)

add_image_texture(square1, image_path)

add_image_texture(square2, "C:\\aaa 2023 dondon\\aaa2023いつもの\\blende_gazou\\test 貼り付け 2023\\20230801 渋谷_HIT_Lemon 2.png")


基本系 配布 001 単位円 torus と xyz軸 円柱

https://drive.google.com/file/d/1adh0pC0n5MUfaPnsQcab8CnTvHu_JqLg/view?usp=drive_link


基本系 配布 002 単位2長さ balls

https://drive.google.com/file/d/1vyg5oFWmw_TK8nwp5TmVSfLH94I6rTaY/view?usp=drive_link


基本系 配布 003 単位2長さ balls 光時計セット 

https://drive.google.com/file/d/1u2Rn_nVBcewe39Vokua9C5n25cdivyyL/view?usp=drive_link


blender 基本系 配布 カタログ 2023 - zionad_mainのブログ https://mokuji000zionad.hatenablog.com/entry/2023/07/31/095208 


20230804 円錐 傾き ほぼ完成


import bpy
import mathutils
import math

# 円周の中心座標
center_x = 0
center_y = 0
center_z = 0

# 円周の半径
radius = 3

# 円周に配置する円錐の数
num_cones = 12

# 円錐の底面が遠くなる位置を定義(例えば、X=2, Y=2, Z=2の場合)
target_x = 0
target_y = 0
target_z = 4

# 円周上の点を計算する
theta_values = [2 * math.pi * i / num_cones for i in range(num_cones)]
circle_points = [(center_x + radius * math.cos(theta), center_y + radius * math.sin(theta), center_z) for theta in theta_values]

# 円錐を配置する関数
def place_cone(position, direction):
    bpy.ops.mesh.primitive_cone_add(vertices=32, radius1=0.2, depth=3, location=position)
    cone = bpy.context.active_object
    bpy.context.view_layer.objects.active = cone

    # 向きを設定
    cone.rotation_euler = direction

# トーラスを描く関数
def draw_torus():
    bpy.ops.mesh.primitive_torus_add(location=(center_x, center_y, center_z), align='WORLD', major_radius=radius+0.0, minor_radius=0.1)

# 円錐を配置
for point in circle_points:
    # (0, 0, 0)への方向を計算
    target_vector = mathutils.Vector((target_x - point[0], target_y - point[1], target_z - point[2]))
    direction_rotation = target_vector.to_track_quat('Z', 'Y').to_euler()

    # 円錐の配置
    place_cone(point, direction_rotation)

# トーラスの描画
draw_torus()


ああああああああああああああああああああああああああああああああああああああああああああ


基本系 配布 001 単位円 torus と xyz軸 円柱

https://drive.google.com/file/d/1adh0pC0n5MUfaPnsQcab8CnTvHu_JqLg/view?usp=drive_link


基本系 配布 002 単位2長さ balls

https://drive.google.com/file/d/1vyg5oFWmw_TK8nwp5TmVSfLH94I6rTaY/view?usp=drive_link


基本系 配布 003 単位2長さ balls 光時計セット 

https://drive.google.com/file/d/1u2Rn_nVBcewe39Vokua9C5n25cdivyyL/view?usp=drive_link


blender 基本系 配布 カタログ 2023 - zionad_mainのブログ https://mokuji000zionad.hatenablog.com/entry/2023/07/31/095208 


20230804 多数トーラスと 多数円錐

ああああああああああああああああああああああああああああああああああああああああああああ


import bpy

import mathutils

import math


# 円周の中心座標

center_x = 0

center_y = 0

center_z = 0


# 円周の半径

radius = 3


# 円錐の高さ

cone_height = 3


# 円周に配置する円錐の数

num_cones = 12


# 円錐の底面が遠くなる位置を定義(例えば、X=2, Y=2, Z=2の場合)

target_x = 2

target_y = 2

target_z = 2


# 円周上の点を計算する

theta_values = [2 * math.pi * i / num_cones for i in range(num_cones)]

circle_points = [(center_x + radius * math.cos(theta), center_y + radius * math.sin(theta), center_z) for theta in theta_values]


# 円錐を配置する関数

def place_cone(position, direction):

    bpy.ops.mesh.primitive_cone_add(vertices=32, radius1=0.2, depth=cone_height, location=position)

    cone = bpy.context.active_object

    bpy.context.view_layer.objects.active = cone


    # 向きを設定

    cone.rotation_euler = direction


# トーラスを描く関数

def draw_torus(position):

    bpy.ops.mesh.primitive_torus_add(location=position, align='WORLD', major_radius=radius, minor_radius=0.2)


# 円錐を配置とトーラスの描画

for point in circle_points:

    # トーラスの描画

    draw_torus(point)


    # (0, 0, 0)への方向を計算

    target_vector = mathutils.Vector((target_x - point[0], target_y - point[1], target_z - point[2]))

    direction_rotation = target_vector.to_track_quat('Z', 'Y').to_euler()


    # 円錐の配置

    place_cone(point, direction_rotation)


基本系 配布 001 単位円 torus と xyz軸 円柱

https://drive.google.com/file/d/1adh0pC0n5MUfaPnsQcab8CnTvHu_JqLg/view?usp=drive_link


基本系 配布 002 単位2長さ balls

https://drive.google.com/file/d/1vyg5oFWmw_TK8nwp5TmVSfLH94I6rTaY/view?usp=drive_link


基本系 配布 003 単位2長さ balls 光時計セット 

https://drive.google.com/file/d/1u2Rn_nVBcewe39Vokua9C5n25cdivyyL/view?usp=drive_link


blender 基本系 配布 カタログ 2023 - zionad_mainのブログ https://mokuji000zionad.hatenablog.com/entry/2023/07/31/095208 


20230804 長い円錐で 向き指定


import bpy

import mathutils

import math


# 円周の中心座標

center_x = 0

center_y = 0

center_z = 0


# 円周の半径

radius = 3


# 円錐の高さ

cone_height = 3


# 円周に配置する円錐の数

num_cones = 12


# 円周上の点を計算する

theta_values = [2 * math.pi * i / num_cones for i in range(num_cones)]

circle_points = [(center_x + radius * math.cos(theta), center_y + radius * math.sin(theta), center_z) for theta in theta_values]


# 円錐を配置する関数

def place_cone(position, direction):

    bpy.ops.mesh.primitive_cone_add(vertices=32, radius1=0.2, depth=cone_height, location=position)

    cone = bpy.context.active_object

    bpy.context.view_layer.objects.active = cone


    # 向きを設定

    cone.rotation_euler = direction


# 円錐を配置

for point in circle_points:

    # 円周上の点から(0, 0, 3)への方向を計算

    direction = mathutils.Vector((0, 0, 1))

    target_vector = mathutils.Vector((point[0] - center_x, point[1] - center_y, center_z + cone_height))

    direction_rotation = target_vector.to_track_quat('Z', 'Y').to_euler()


    # 180度回転させる

    direction_rotation[2] += math.radians(180)


    place_cone(point, direction_rotation)


import bpy

import mathutils

import math


# 円周の中心座標

center_x = 0

center_y = 0

center_z = 0


# 円周の半径

radius = 3


# 円錐の高さ

cone_height = 0.6


# 円周に配置する円錐の数

num_cones = 12


# 円錐の底面が遠くなる位置を定義(例えば、X=2, Y=2, Z=2の場合)

target_x = 0

target_y = 0

target_z = 2


# 円周上の点を計算する

theta_values = [2 * math.pi * i / num_cones for i in range(num_cones)]

circle_points = [(center_x + radius * math.cos(theta), center_y + radius * math.sin(theta), center_z) for theta in theta_values]


# 円錐を配置する関数

def place_cone(position, direction):

    bpy.ops.mesh.primitive_cone_add(vertices=32, radius1=0.2, depth=cone_height, location=position)

    cone = bpy.context.active_object

    bpy.context.view_layer.objects.active = cone


    # 向きを設定

    cone.rotation_euler = direction


# 円錐を配置

for point in circle_points:

    # (0, 0, 0)への方向を計算

    target_vector = mathutils.Vector((target_x - point[0], target_y - point[1], target_z - point[2]))

    direction_rotation = target_vector.to_track_quat('Z', 'Y').to_euler()


    # 位置を調整して円錐の底面が指定した位置に配置されるようにする

    position = mathutils.Vector((point[0] + target_vector.x, point[1] + target_vector.y, point[2] + target_vector.z))


    place_cone(position, direction_rotation)


基本系 配布 001 単位円 torus と xyz軸 円柱

https://drive.google.com/file/d/1adh0pC0n5MUfaPnsQcab8CnTvHu_JqLg/view?usp=drive_link


基本系 配布 002 単位2長さ balls

https://drive.google.com/file/d/1vyg5oFWmw_TK8nwp5TmVSfLH94I6rTaY/view?usp=drive_link


基本系 配布 003 単位2長さ balls 光時計セット 

https://drive.google.com/file/d/1u2Rn_nVBcewe39Vokua9C5n25cdivyyL/view?usp=drive_link


blender 基本系 配布 カタログ 2023 - zionad_mainのブログ https://mokuji000zionad.hatenablog.com/entry/2023/07/31/095208 


テスト


import bpy

import math


# 小数の桁数を指定

decimal_places = 1

# 図形の大きさ

size = 0.3


def create_plane_at_position(position, width, height, name, x, y, z):

    # 平面を作成(指定した座標に)

    bpy.ops.mesh.primitive_plane_add(size=1, location=position)

    plane = bpy.context.active_object


    # 幅と高さを設定

    plane.scale = (width, height, 1)


    # マテリアルを作成

    material = bpy.data.materials.new(name="Material_" + name)

    plane.data.materials.append(material)


    # マテリアルの設定

    material.use_nodes = False

    material.diffuse_color = (0.0, 1.0, 0.0, 1.0)  # 緑色 (R:0.0, G:1.0, B:0.0, A:1.0)


    # オブジェクトの名前を設定

    formatted_name = "{} ({:.{}f}, {:.{}f}, {:.{}f})".format(name, x, decimal_places, y, decimal_places, z, decimal_places)

    plane.name = formatted_name


def create_cone_or_circle_at_position(position, radius, height, name, x, y, z):

    if position == (0, 0, 0):

        # (0, 0, 0) の場合は円を作成

        bpy.ops.mesh.primitive_circle_add(radius=radius, location=position)

        obj = bpy.context.active_object

    else:

        # それ以外の場合は円錐を作成

        bpy.ops.mesh.primitive_cone_add(vertices=32, radius1=radius, radius2=0, depth=height, location=position)

        obj = bpy.context.active_object


        # 円錐の底面中心を (0, 0, 0) から遠ざける向きを計算

        direction = math.atan2(position[1], position[0])

        distance = math.sqrt(position[0]**2 + position[1]**2 + position[2]**2)

        angle = math.acos(position[2] / distance)

        obj.rotation_euler = (angle + math.pi, 0, direction + math.pi / 2)  # Y軸回りに90度回転


    # マテリアルを作成

    material = bpy.data.materials.new(name="Material_" + name)

    obj.data.materials.append(material)


    # マテリアルの設定

    material.use_nodes = False

    material.diffuse_color = (1.0, 0.0, 0.0, 1.0)  # 赤色 (R:1.0, G:0.0, B:0.0, A:1.0)


    # オブジェクトの名前を設定

    formatted_name = "{} ({:.{}f}, {:.{}f}, {:.{}f})".format(name, x, decimal_places, y, decimal_places, z, decimal_places)

    obj.name = formatted_name


# 円周上に等間隔に12個の図形を作成

radius = 3.0  # 半径

center_x = 0.0  # 中心のX座標

center_y = 0.0  # 中心のY座標

num_objects = 24  # 図形の個数


for i in range(num_objects):

    angle = i * (2 * math.pi / num_objects)  # 等間隔の角度

    x = center_x + radius * math.cos(angle)

    y = center_y + radius * math.sin(angle)

    z = 0


    position = (x, y, z)

    plane_name = "地図位置"

    obj_name = "事象情報"


    create_plane_at_position(position, size, size, plane_name, x, y, z)

    create_cone_or_circle_at_position(position, math.sqrt(2) * size / 2, size / 2, obj_name, x, y, z)


基本系 配布 001 単位円 torus と xyz軸 円柱

https://drive.google.com/file/d/1adh0pC0n5MUfaPnsQcab8CnTvHu_JqLg/view?usp=drive_link


基本系 配布 002 単位2長さ balls

https://drive.google.com/file/d/1vyg5oFWmw_TK8nwp5TmVSfLH94I6rTaY/view?usp=drive_link


基本系 配布 003 単位2長さ balls 光時計セット 

https://drive.google.com/file/d/1u2Rn_nVBcewe39Vokua9C5n25cdivyyL/view?usp=drive_link


blender 基本系 配布 カタログ 2023 - zionad_mainのブログ https://mokuji000zionad.hatenablog.com/entry/2023/07/31/095208 
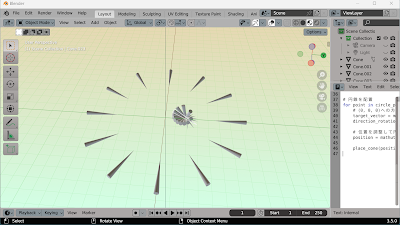


20230804  円錐の向きを 指定 改良


import bpy

import math

import mathutils


# 小数の桁数を指定

decimal_places = 1

# 図形の大きさ

size = 0.3


def create_plane_at_position(position, width, height, name, x, y, z):

    # 平面を作成(指定した座標に)

    bpy.ops.mesh.primitive_plane_add(size=1, location=position)

    plane = bpy.context.active_object


    # 幅と高さを設定

    plane.scale = (width, height, 1)


    # マテリアルを作成

    material = bpy.data.materials.new(name="Material_" + name)

    plane.data.materials.append(material)


    # マテリアルの設定

    material.use_nodes = False

    material.diffuse_color = (0.0, 1.0, 0.0, 1.0)  # 緑色 (R:0.0, G:1.0, B:0.0, A:1.0)


    # オブジェクトの名前を設定

    formatted_name = "{} ({:.{}f}, {:.{}f}, {:.{}f})".format(name, x, decimal_places, y, decimal_places, z, decimal_places)

    plane.name = formatted_name


def create_cone_or_circle_at_position(position, radius, height, name, x, y, z, cone_direction=(0, 0, 1)):

    if position == (0, 0, 0):

        # (0, 0, 0) の場合は円を作成

        bpy.ops.mesh.primitive_circle_add(radius=radius, location=position)

        obj = bpy.context.active_object

    else:

        # それ以外の場合は円錐を作成

        bpy.ops.mesh.primitive_cone_add(vertices=32, radius1=radius, radius2=0, depth=height, location=position)

        obj = bpy.context.active_object


        # 円錐の底面中心を指定の方向に向ける

        direction = mathutils.Vector(cone_direction).normalized()

        z_axis = mathutils.Vector((0, 0, 1))

        rotation_quat = z_axis.rotation_difference(direction)

        obj.rotation_mode = 'QUATERNION'

        obj.rotation_quaternion = rotation_quat


    # マテリアルを作成

    material = bpy.data.materials.new(name="Material_" + name)

    obj.data.materials.append(material)


    # マテリアルの設定

    material.use_nodes = False

    material.diffuse_color = (1.0, 0.0, 0.0, 1.0)  # 赤色 (R:1.0, G:0.0, B:0.0, A:1.0)


    # オブジェクトの名前を設定

    formatted_name = "{} ({:.{}f}, {:.{}f}, {:.{}f})".format(name, x, decimal_places, y, decimal_places, z, decimal_places)

    obj.name = formatted_name


# 円周上に等間隔に12個の図形を作成

radius = 3.0  # 半径

center_x = 1.0  # 中心のX座標

center_y = 2.0  # 中心のY座標

num_objects = 12  # 図形の個数


for i in range(num_objects):

    angle = i * (2 * math.pi / num_objects)  # 等間隔の角度

    x = center_x + radius * math.cos(angle)

    y = center_y + radius * math.sin(angle)

    z = 0


    position = (x, y, z)

    plane_name = "地図位置"

    obj_name = "事象情報"

    cone_direction = (1, 1, 1)  # 円錐の向きを指定 (X, Y, Z)


    create_plane_at_position(position, size, size, plane_name, x, y, z)

    create_cone_or_circle_at_position(position, math.sqrt(2) * size / 2, size / 2, obj_name, x, y, z, cone_direction)


基本系 配布 001 単位円 torus と xyz軸 円柱

https://drive.google.com/file/d/1adh0pC0n5MUfaPnsQcab8CnTvHu_JqLg/view?usp=drive_link


基本系 配布 002 単位2長さ balls

https://drive.google.com/file/d/1vyg5oFWmw_TK8nwp5TmVSfLH94I6rTaY/view?usp=drive_link


基本系 配布 003 単位2長さ balls 光時計セット 

https://drive.google.com/file/d/1u2Rn_nVBcewe39Vokua9C5n25cdivyyL/view?usp=drive_link


blender 基本系 配布 カタログ 2023 - zionad_mainのブログ https://mokuji000zionad.hatenablog.com/entry/2023/07/31/095208 


20230804 000に進む 事象情報


import bpy

import math


# 小数の桁数を指定

decimal_places = 1

# 図形の大きさ

size = 0.3


def create_plane_at_position(position, width, height, name, x, y, z):

    # 平面を作成(指定した座標に)

    bpy.ops.mesh.primitive_plane_add(size=1, location=position)

    plane = bpy.context.active_object


    # 幅と高さを設定

    plane.scale = (width, height, 1)


    # マテリアルを作成

    material = bpy.data.materials.new(name="Material_" + name)

    plane.data.materials.append(material)


    # マテリアルの設定

    material.use_nodes = False

    material.diffuse_color = (0.0, 1.0, 0.0, 1.0)  # 緑色 (R:0.0, G:1.0, B:0.0, A:1.0)


    # オブジェクトの名前を設定

    formatted_name = "{} ({:.{}f}, {:.{}f}, {:.{}f})".format(name, x, decimal_places, y, decimal_places, z, decimal_places)

    plane.name = formatted_name


def create_cone_or_circle_at_position(position, radius, height, name, x, y, z):

    if position == (0, 0, 0):

        # (0, 0, 0) の場合は円を作成

        bpy.ops.mesh.primitive_circle_add(radius=radius, location=position)

        obj = bpy.context.active_object

    else:

        # それ以外の場合は円錐を作成

        bpy.ops.mesh.primitive_cone_add(vertices=32, radius1=radius, radius2=0, depth=height, location=position)

        obj = bpy.context.active_object


        # 円錐の底面中心を (0, 0, 0) から遠ざける向きを計算

        direction = math.atan2(position[1], position[0])

        distance = math.sqrt(position[0]**2 + position[1]**2 + position[2]**2)

        angle = math.acos(position[2] / distance)

        obj.rotation_euler = (angle + math.pi, 0, direction + math.pi / 2)  # Y軸回りに90度回転


    # マテリアルを作成

    material = bpy.data.materials.new(name="Material_" + name)

    obj.data.materials.append(material)


    # マテリアルの設定

    material.use_nodes = False

    material.diffuse_color = (1.0, 0.0, 0.0, 1.0)  # 赤色 (R:1.0, G:0.0, B:0.0, A:1.0)


    # オブジェクトの名前を設定

    formatted_name = "{} ({:.{}f}, {:.{}f}, {:.{}f})".format(name, x, decimal_places, y, decimal_places, z, decimal_places)

    obj.name = formatted_name


# 円周上に等間隔に12個の図形を作成

radius = 3.0  # 半径

center_x = 1.0  # 中心のX座標

center_y = 2.0  # 中心のY座標

num_objects = 12  # 図形の個数


for i in range(num_objects):

    angle = i * (2 * math.pi / num_objects)  # 等間隔の角度

    x = center_x + radius * math.cos(angle)

    y = center_y + radius * math.sin(angle)

    z = 0


    position = (x, y, z)

    plane_name = "地図位置"

    obj_name = "事象情報"


    create_plane_at_position(position, size, size, plane_name, x, y, z)

    create_cone_or_circle_at_position(position, math.sqrt(2) * size / 2, size / 2, obj_name, x, y, z)


基本系 配布 001 単位円 torus と xyz軸 円柱

https://drive.google.com/file/d/1adh0pC0n5MUfaPnsQcab8CnTvHu_JqLg/view?usp=drive_link


基本系 配布 002 単位2長さ balls

https://drive.google.com/file/d/1vyg5oFWmw_TK8nwp5TmVSfLH94I6rTaY/view?usp=drive_link


基本系 配布 003 単位2長さ balls 光時計セット 

https://drive.google.com/file/d/1u2Rn_nVBcewe39Vokua9C5n25cdivyyL/view?usp=drive_link


blender 基本系 配布 カタログ 2023 - zionad_mainのブログ https://mokuji000zionad.hatenablog.com/entry/2023/07/31/095208 


20230804 事象情報 円錐で表現


import bpy

import math


# 小数の桁数を指定

decimal_places = 1


def create_plane_at_position(position, width, height, name, x, y, z):

    # 平面を作成(指定した座標に)

    bpy.ops.mesh.primitive_plane_add(size=1, location=position)

    plane = bpy.context.active_object


    # 幅と高さを設定

    plane.scale = (width, height, 1)


    # マテリアルを作成

    material = bpy.data.materials.new(name="Material_" + name)

    plane.data.materials.append(material)


    # マテリアルの設定

    material.use_nodes = False

    material.diffuse_color = (0.0, 1.0, 0.0, 1.0)  # 緑色 (R:0.0, G:1.0, B:0.0, A:1.0)


    # オブジェクトの名前を設定

    formatted_name = "{} ({:.{}f}, {:.{}f}, {:.{}f})".format(name, x, decimal_places, y, decimal_places, z, decimal_places)

    plane.name = formatted_name


def create_cone_or_circle_at_position(position, radius, height, name, x, y, z):

    if position == (0, 0, 0):

        # (0, 0, 0) の場合は円を作成

        bpy.ops.mesh.primitive_circle_add(radius=radius, location=position)

        obj = bpy.context.active_object

    else:

        # それ以外の場合は円錐を作成

        bpy.ops.mesh.primitive_cone_add(vertices=32, radius1=radius, radius2=0, depth=height, location=position)

        obj = bpy.context.active_object


        # 円錐の底面中心を (0, 0, 0) から遠ざける向きを計算

        direction = math.atan2(position[1], position[0])

        distance = math.sqrt(position[0]**2 + position[1]**2 + position[2]**2)

        angle = math.acos(position[2] / distance)

        obj.rotation_euler = (angle + math.pi, 0, direction + math.pi / 2)  # Y軸回りに90度回転


    # マテリアルを作成

    material = bpy.data.materials.new(name="Material_" + name)

    obj.data.materials.append(material)


    # マテリアルの設定

    material.use_nodes = False

    material.diffuse_color = (1.0, 0.0, 0.0, 1.0)  # 赤色 (R:1.0, G:0.0, B:0.0, A:1.0)


    # オブジェクトの名前を設定

    formatted_name = "{} ({:.{}f}, {:.{}f}, {:.{}f})".format(name, x, decimal_places, y, decimal_places, z, decimal_places)

    obj.name = formatted_name


# 正方形の面と円錐または円を作成

size = 0.3  # 正方形の一辺の長さ

spacing = 1.0  # 1間隔の大きさ


for i in range(-5, 6):  # -5から5までの座標に作成

    x = i * spacing

    y = 0

    z = 0


    position = (x, y, z)

    plane_name = "地図位置"

    obj_name = "事象情報"


    create_plane_at_position(position, size, size, plane_name, x, y, z)

    create_cone_or_circle_at_position(position, math.sqrt(2) * size / 2, size / 2, obj_name, x, y, z)


基本系 配布 001 単位円 torus と xyz軸 円柱

https://drive.google.com/file/d/1adh0pC0n5MUfaPnsQcab8CnTvHu_JqLg/view?usp=drive_link


基本系 配布 002 単位2長さ balls

https://drive.google.com/file/d/1vyg5oFWmw_TK8nwp5TmVSfLH94I6rTaY/view?usp=drive_link


基本系 配布 003 単位2長さ balls 光時計セット 

https://drive.google.com/file/d/1u2Rn_nVBcewe39Vokua9C5n25cdivyyL/view?usp=drive_link


blender 基本系 配布 カタログ 2023 - zionad_mainのブログ https://mokuji000zionad.hatenablog.com/entry/2023/07/31/095208 


20230804 地図の地面相当の正方形


import bpy


def create_plane_at_position(position, width, height, name):

    # 平面を作成(指定した座標に)

    bpy.ops.mesh.primitive_plane_add(size=1, location=position)

    plane = bpy.context.active_object


    # 幅と高さを設定

    plane.scale = (width, height, 1)


    # マテリアルを作成

    material = bpy.data.materials.new(name="Material_" + name)

    plane.data.materials.append(material)


    # マテリアルの設定

    material.use_nodes = False

    material.diffuse_color = (0.0, 1.0, 0.0, 1.0)  # 緑色 (R:0.0, G:1.0, B:0.0, A:1.0)


    # オブジェクトの名前を設定

    plane.name = name


# 正方形の面を複数作成

size = 0.3  # 正方形の一辺の長さ

spacing = 1.0  # 1間隔の大きさ


for i in range(-5, 6):  # -5から5までの座標に作成

    create_plane_at_position((i * spacing, 0, 0), size, size, f"square_face_{i}")